![]()
![]()
![]()
![]()
![]()
![]()
|
|
|
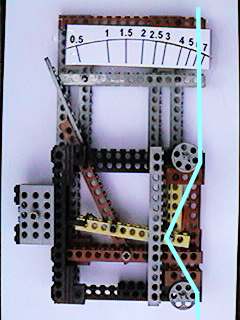
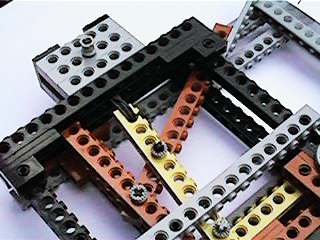
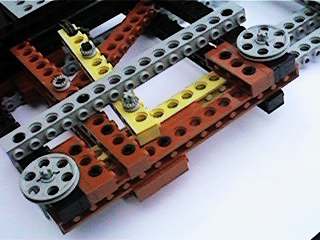
As I tell my friends, I have ten thumbs. I wanted to build the tensiometer described in Larry Robinson & Bob Wells' book, "Optimizing the East Coast 12-Meter" on page 238. (You don't have the book? Don't let the fact that it deals with the EC-12 deter you. It is stuffed with seriously useful data and ideas for ALL radio racing yachts, including the IOM. More details in my Books list.) My thumbs got in the way, so I hauled out the kids' Lego blocks, and this is the result. The lurid light blue line represents the backstay or shroud whose tension you are measuring. The scale is calibrated in approximate pounds. In fact it is calibrated in terms of "Cans of Campbell's soup". I hung a shopping bag from the doorway on a length of backstay wire. As I put can after can into the bag, I measured the tension and marked the number of cans on the scale. "Voila!" as they say in France... Turn up the brightness on your monitor, and you'll be able to see the lengths of "roach pole elastic" which act as the tensiometer's spring in the following detail shot. The elastic attaches to one end of the (yellow) drawbar. The other end of the drawbar has a small pulley wheel. In the middle of the drawbar is the pivot attachment to the indicator arm. The indicator arm pivots a few Lego holes below the drawbar.
From the other side, you can see where the backstay or shroud is set against the two larger pulley wheels. The smaller pulley on the drawbar then pulls on the stay. The amount of sag that the drawbar can induce in the stay is the measurement of its tension, and can be read off on the scale.
Oh yeah. Be prepared for some ribbing at the pond side when you whip it out and start muttering "Hmmm... 2.5... I think I need 3 today..." I spotted a grand-daddy tensiometer while browsing the NACA site. Larry Robinson tells me he tried the same sort of idea at first, but the dial gauge had too much "stiction". Point your browser to http://naca.larc.nasa.gov/reports/1920/naca-report-32/ and enjoy.
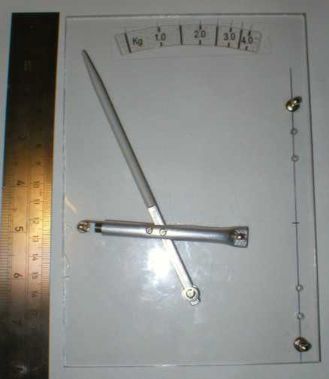
Regular browsers of these pages will remember that all my gear was stolen from my camper one day. Including the Lego tensiometer. I've since replaced it with this version, knocked up in the workshop over an afternoon. The base plate is a piece of clear acrylic plastic. The draw bar is an 8 mm aluminium tube, slotted for the knitting needle pointer. The tension spring came in a fine collection of miscellaneous springs from the local hobby shop. Calibration this time is in Kg, courtesy of a number of cans of baked beans. The ruler at the side is meant to give an indication of scale. The only slight flaw in this version is that the spring is not pre-tensioned, so quite a lot of "measurement" area is wasted taking up the slack. 2010-04-05 |
|
©2025 Lester Gilbert |