![]()
![]()
![]()
![]()
![]()
![]()
|
|
|
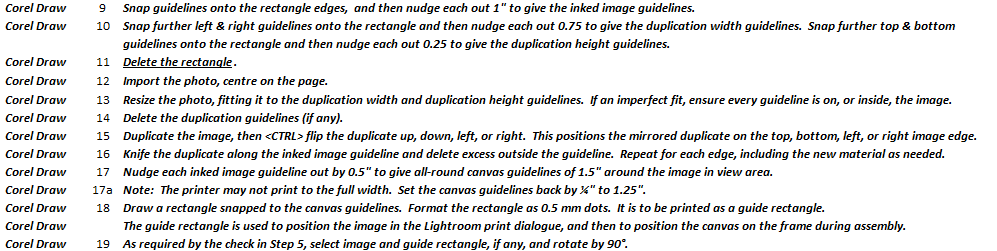
Wrapping a canvas print around a frame is one of the most straightforward (and inexpensive) ways of getting a photo onto a wall. Calculating and then printing the required extra imagery for the edges of the canvas wrap can be less straightforward. I've constructed an Excel spreadsheet to help with the task, download here. (Now improved to version 5 with better explanations of workflow.)
The spreadsheet download provides a locked file, where non-input cells are locked against editing. This means that inadvertent keyboard and mouse errors will not damage the spreadsheet. The password is "wrap" in case you do want to make edits (at your own risk!).
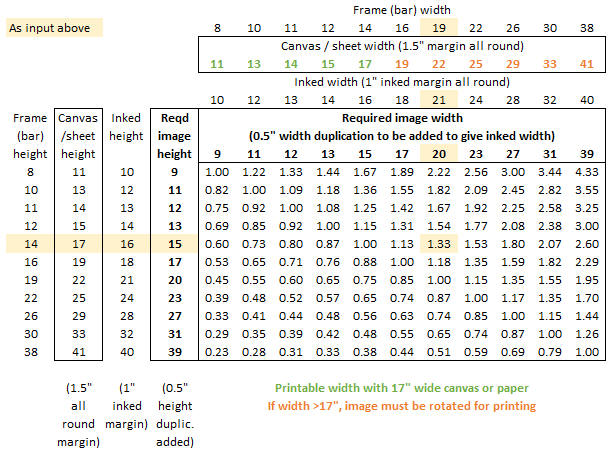
CalculationsThe spreadsheet makes provision for the input of relevant print and printer parameters (pink cells) and frame and photo measurements (yellow cells), and the output of required data (bold outline green cell) along with information (green) and advisory (orange) notifications, as shown below.
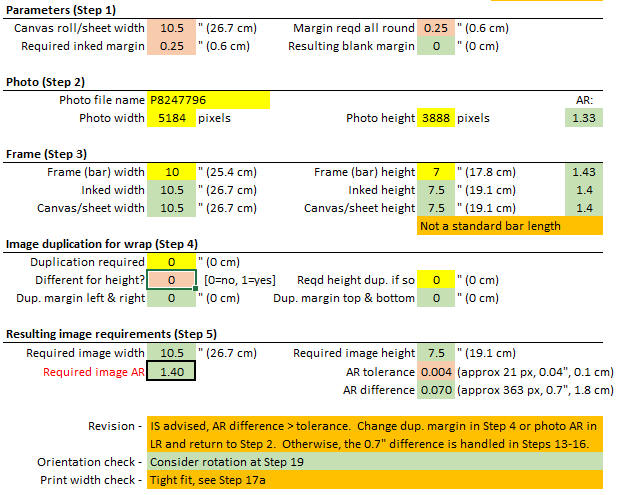
Frames are made using wooden stretcher bars that are usually around ¾" thick, and they therefore need around 1" of inked canvas to wrap around the bar. Some further canvas is needed to allow comfortable fixing to the rear of the frame, something like an all-round margin of 1½" of canvas. Our example uses an Epson SC-P800 loaded with a 17" roll of canvas. These are the parameters required by the spreadsheet in Step 1, as below. The spreadsheet notes that, given an overall margin of 1½" and a 1" inked wrap, the margin of blank canvas is ½". In general, throughout the spreadsheet, metric equivalents are given for the inch measurements.
The spreadsheet will complain if the required inked margin is larger than the all-round margin, as below. Note that the red background fill indicates this error should not be ignored because the remainder of the spreadsheet calculations will be in error as well.
For our running example, we consider a nice landscape photo (file name P8247796) that we want to print and frame. The photo is 5184 × 3888 pixels which is input into the spreadsheet in Step 2 as below. The spreadsheet notes the aspect ratio (AR) of the photo is 1.33. We know that we'll probably have to print rotated to portrait orientation, but the spreadsheet takes the convention that the photo and frame details are entered with respect to the desired framed print to be hung on the wall, and it directs any necessary rotation later in the workflow.
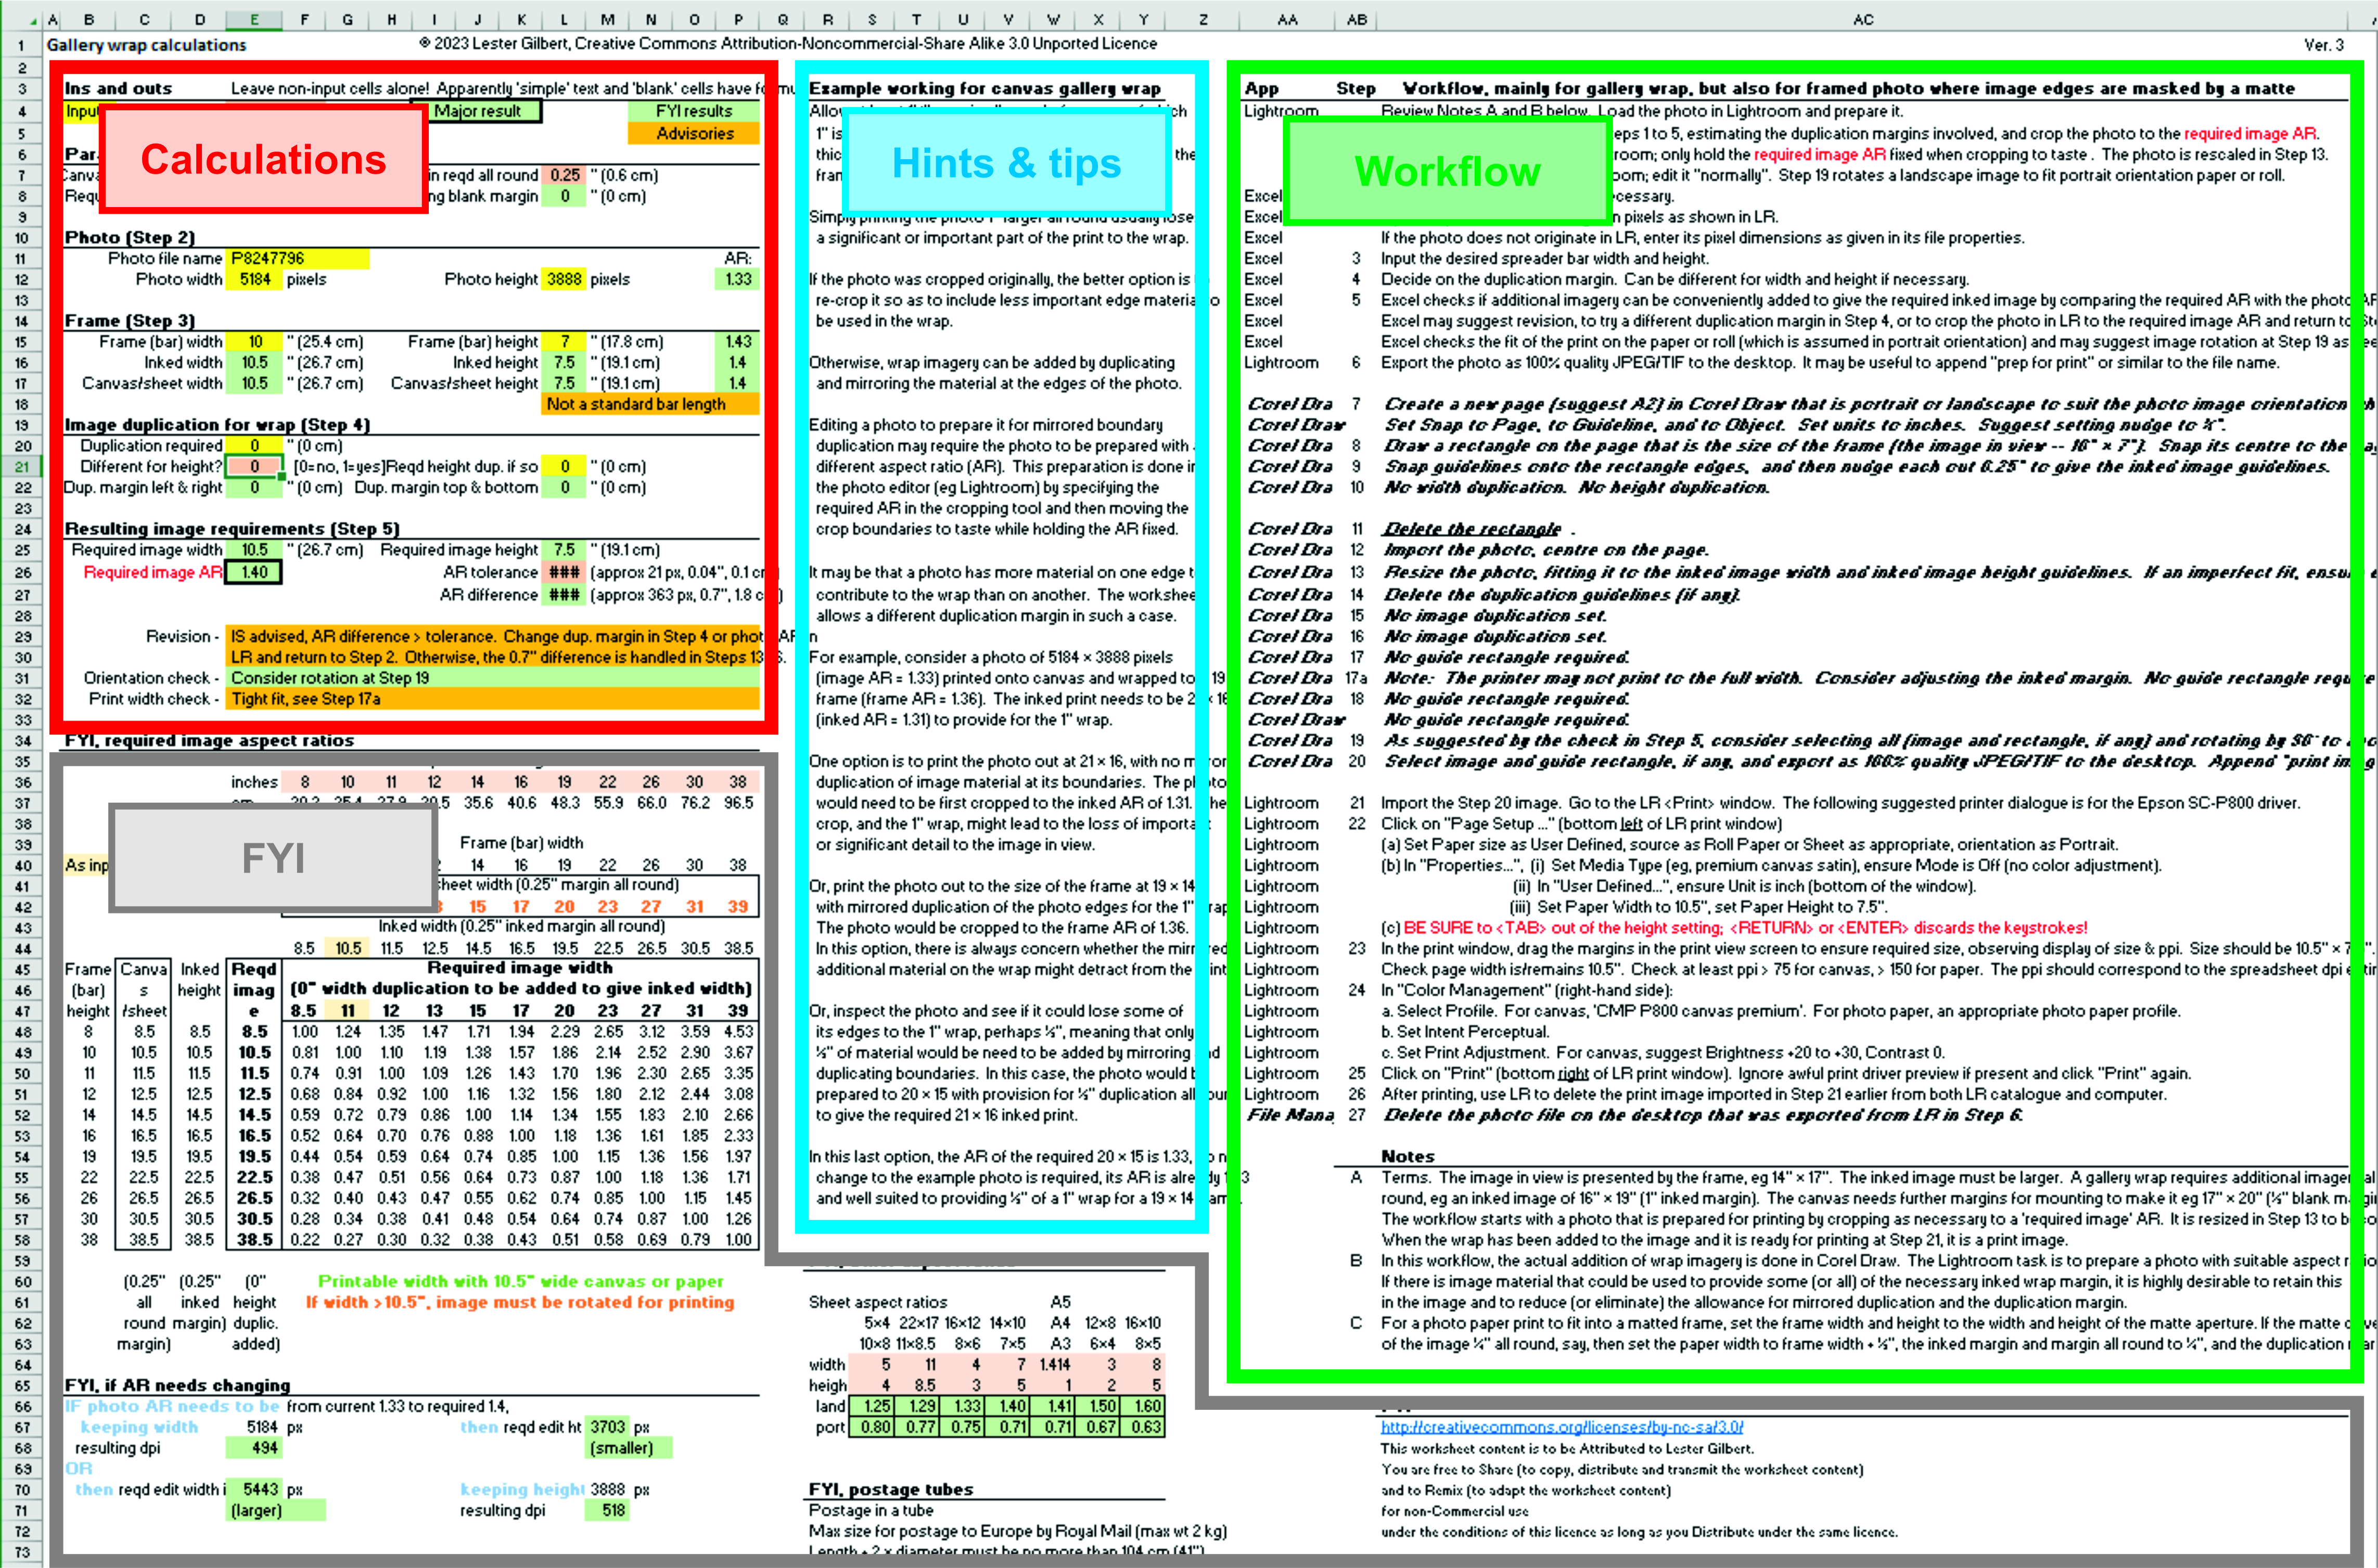
We want a frame that is 19" wide × 14" high for our photo, and this is input in Step 3, as below. The spreadsheet notes the AR of the frame, 1.36. For the consequent print, the spreadsheet gives the details of the inked size and the size of the canvas and their AR.
The spreadsheet has a built-in range of default spreader bar lengths at row 36, as below. These are editable parameters should you have or use different values.
The spreadsheet complains if your proposed frame has non-standard bar lengths, as illustrated below. Note that the background fill of the messages is an "advisory" orange, indicating that the remainder of the spreadsheet calculations remain valid if the entered width and height values are genuinely intended. This may be the case, for example, if the calculations are for printing to photo paper which has different standard dimensions.
At this point, (a) it is clear that the photo AR of 1.33 does not match the frame AR of 1.36. If the photo were to be printed out at the frame size of 19" × 14" it would need to be appropriately cropped, probably by reducing the height, and then material would need to be added to provide the inked wrap and an inked 21" × 16" image . (b) It is also clear that the photo, with AR 1.33, will require cropping if it is to be printed to the required inked width and height of 21" × 16" with AR 1.31 in order to provide the 1" inked wrap. In this case, the photo width would probably be reduced in the crop.
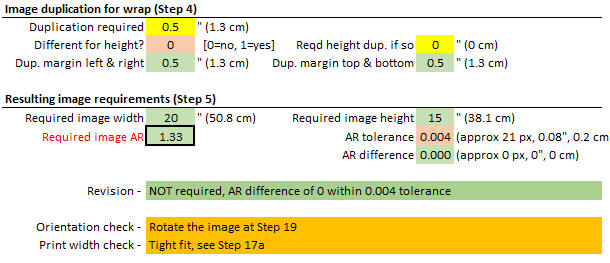
Option (a), photo cropped to frame, full additional imagery for the wrapOption (a), adjusting the photo to suit the frame, requires 1" of additional imagery around the photo to provide wrap. This would usually be the case for an image which (i) was carefully composed in-camera in the first place; (ii) had been previously cropped to a particular artistic intent; or (iii) simply does not have an unimportant or insignificant boundary that can be lost to the wrap. Note that the boundary between the photo and the additional imagery in the wrap may be quite visible, sometimes obtrusively so, particularly if the photo edges contain high contrast rather than diffuse bokeh. For this reason, the next option, (b), should be carefully considered. The spreadsheet assumes the additional imagery for the inked print is obtained by duplicating, mirroring, and then trimming the photo boundaries and adding this to the photo edges. In the spreadsheet, the required image duplication is entered as 1" (or whatever was decided as the required inked margin in the earlier parameters) in Step 4, as shown below.
The spreadsheet provides the required image AR to suit the 19" × 14" frame in Step 5, as below.
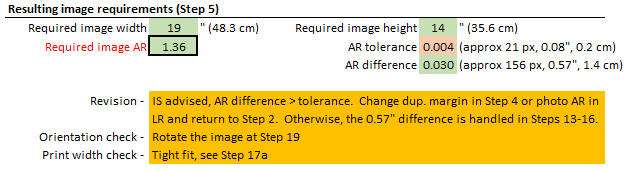
The "Revision" advisory note confirms that the photo will need to be edited. The revision note mentions an AR tolerance parameter (user-adjustable) which is used to assess the closeness of the match between the photo AR and the required AR. The default tolerance of 0.004 is that the two AR values should not differ by more than this value, so for example the spreadsheet will advise changing an AR of 1.335 to 1.340 but not an AR of 1.336. For this example, the implications of the difference in AR of 0.03 between the photo and the required image are shown in the "AR difference" line in case that is useful in deciding whether to proceed with re-cropping. Note the revision advisory note has an orange background, hence its wording, "revision is advised". If revision is not made, the note explains that the difference between the photo AR and the required AR, a difference of approximately 0.57" in the print, will be dealt with later in the workflow. We cover this later in this tutorial. If re-cropping is considered, the spreadsheet provides some guidance on appropriate pixel dimensions starting at row 65 (usually not seen in the computer screen, scroll down!), as below. Increasing the AR from 1.33 to 1.36 would involve a smaller height at 3820 pixels. If the photo has been previously (non-destructively) cropped, on the other hand, it may be possible to increase the width to 5276, though the gain in print resolution is a very modest 5 dpi.
If a different amount of image duplication is considered, there is the facility to have different amounts at top and bottom from the amounts at left and right. In this case, enter "1" for the "Different for height?" parameter, and provide the required amount. Note that the spreadsheet will complain if the duplication required is larger than the required inked margin identified earlier in the parameters, as below.
Finally, for the example frame and photo, the "Orientation check" advises that the image requires to be rotated to portrait orientation in Step 19. The advisory also notes "Tight fit" in the "Print width check" because the image will print to the full limit of the roll width when a guide rectangle is added later in the workflow at Step 17. This may be relevant, for example, if the printer physically accepts 17" paper but only prints out to 16.8", and Step 17a advises a slightly smaller guide rectangle.
Note on additional imagery for the wrapThere are alternatives to mirrored duplication of the photo edges to provide the inked margin of the wrap. (i) The wrap could be left as blank canvas. This is unlikely to be aesthetically pleasing unless the image was particularly high key with very pale or white boundaries. (ii) The wrap could be inked to black. Not usually as bad as a blank (white) wrap, and perhaps suitable for an image with dark boundaries. (iii) The wrap could be inked to the wall colour or wall pattern of the intended display location. This would work where photo and wall are designed to be complimentary, with perhaps the inked wrap in a slightly more saturated wall colour to provide contrast.
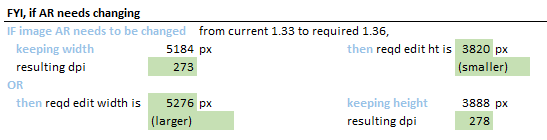
Option (b), photo cropped to provide the wrap, no additional imageryOption (b), using 1" of the original photo to provide the wrap, is ideal if at all possible because the boundary between the image in view and the wrap is then perfectly seamless. In the spreadsheet, the required image duplication is entered as 0" in Step 4, with the resulting image requirements shown in Step 5, as below.
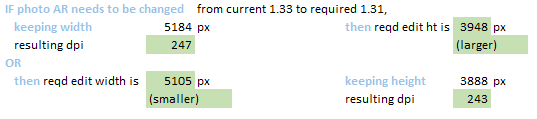
The spreadsheet notes the required image AR to suit the 21" × 16" inked image is 1.31. The "Revision" advisory note confirms that the photo will need to be edited. The difference in AR of 0.02 between the photo and the required image will lead to a difference of approximately 0.38" in the print if not fixed by changing the duplication margin or the photo AR. If re-cropping is considered, the spreadsheet provides guidance on the revised pixel dimensions, as below. Decreasing the AR from 1.33 to 1.31 would involve a smaller width at 5105 pixels. If the photo has been previously (non-destructively) cropped, on the other hand, it may be possible to increase the height to 3948, though the gain in print resolution is a negligible 4 dpi.
Option (c), partial photo, partial additional imagery for wrapThere is a third option, (c), using some, but not all, of the original photo to provide some, but not all, of the wrap. The remainder of the wrap would need to be provided using one of the techniques mentioned under option (a) (the spreadsheet assumes mirrored duplication). For our example, if ½" of the wrap is contributed by the original image, the image AR would need to be 1.33 when shown in Step 5, as below. Coincidentally, this is the AR of the image, and so no editing would be needed.
Calculating the matte for photo paper printsInstead of calculating canvas wrap, the spreadsheet can serve to calculate the required print image for a matted photo frame. Keeping our landscape photo that is 5184 × 3888 pixels, we consider placing it into an A4 frame under a matte with a 10" × 7" aperture and having no more than ¼" of the print hidden around its edges. We can ignore the dimensions of the photo frame and deal simply with the requirement for a print image that is 10½" × 7½". The parameters are a sheet width of 10.5", all round margins of ¼", and required inked margins of ¼". The frame is entered as the size of the matte aperture, 10" × 7", and the duplication margin as 0". The result of Steps 1 to 5 are as below.
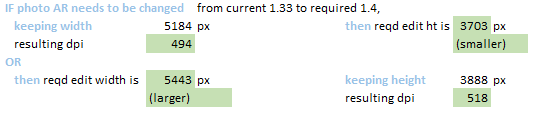
The key output is the required AR of 1.40, where we can see that the photo will need to be cropped and height lost. The spreadsheet suggests the pixel count for the revised height as 3703 to give the necessary AR of 1.40.
When calculating a print to go under a matte, there is no particular need for Corel Draw and the addition of inked wrap in Steps 6 to 21, the workflow can jump to Step 22 in Lightroom to print the cropped image on A4 photo paper.
Spreadsheet FYI for required image ARThe spreadsheet provides AR calculations for all the standard spreader bars, starting at row 39, which might be useful in deciding alternative frame sizes. Using the example of the 19" × 14" frame with 22" × 17" canvas, 21" × 16" inked image, and 20" × 15" photo with ½" duplication for the wrap, it can be seen that frames such as 16" × 12" and 14" × 10" with these parameters would require the photo AR to be 1.31 and 1.36, not that far away from the current 1.33 which is highlighted, as below.
WorkflowThe spreadsheet provides a workflow in the right-hand columns. Steps 1 to 5 are for the calculations as explained above.
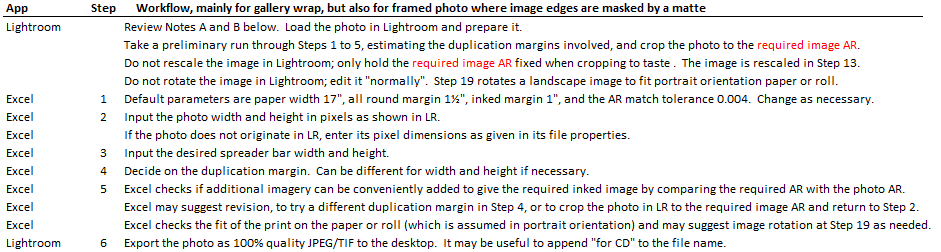
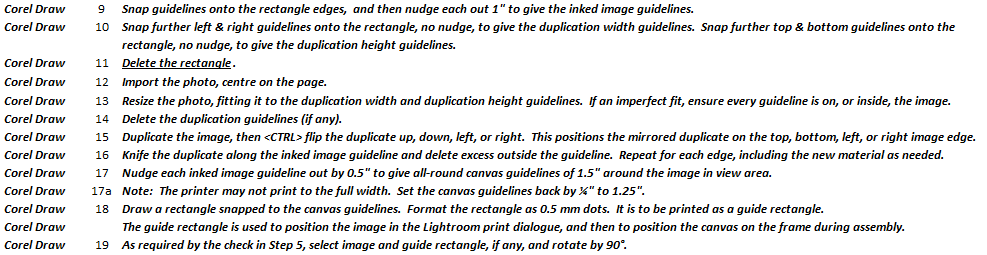
From Step 6, the workflow deals with the construction of the print image and, from Step 22, printing it. The prepared photo is exported from Lightroom (or your photo editor of choice) in Step 6. In another editor, such as Corel Draw which is used here, the print image is prepared. Wrap imagery and a guide rectangle are added, and the result rotated if needed, before being exported back to Lightroom for printing. Corel Draw is used because of its exceptionally straightforward gallery wrap ability to create, add, and trim the required additional mirrored duplication at the photo edges.
Print image constructionThe first 2 construction steps are as below. Note that the text of the workflow adapts to the specifics of the input data for image and frame, here 19" × 14" for our example. The orientation of the new page in Step 7 should be the expected orientation of the final print image; portrait or landscape if the print image is laid out in portrait or landscape, or portrait if the (originally landscape) print image is to be rotated to portrait to fit the printer. The rotation takes place in Step 19; at Step 8, the frame is drawn to match the orientation of what will be hung on the wall.
Workflow for Option (a), full additional imagery for the wrapBecause the wrap consists entirely of mirrored duplicates of the photo edges, the drawing guidelines for constructing the wrap material start from the edge of the frame, that is, the photo, as per Step 10. It may be that, in Step 13, the photo does not properly fit to the guidelines for duplication. Perhaps it was not, or was imperfectly, cropped to give the required AR. No matter; what is essential is that the photo is resized to lie outside of, or meet, every duplication guideline.
Step 17a reflects the "Tight fit" advisory in the spreadsheet calculations, and Step 19 reflects the rotation advisory.
Workflow for Option (b), no additional imagery for the wrapBecause the wrap consists entirely of the photo boundaries, there are no drawing guidelines for constructing wrap material, and there is no duplication, mirroring, or trimming of image material.
Workflow for Option (c), partial additional imagery for the wrapThe workflow identifies the positions of the guidelines for constructing the wrap material according to duplication margins. The example here provides for ¼" duplication on the width (left and right) and ¾" duplication on the height (top and bottom), as per Step 10. Note the positioning of the guidelines which are accordingly offset from the 1" inked margin -- ¼" duplication on the width requires the width duplication guideline to be nudged ¾" out from the frame left and right.
Other print image construction workflow changesThe spreadsheet may suggest print image rotation for any print at the printer width limit, as below, illustrated by a photo to be wrapped to a 14" × 12" frame.
Workflow for mismatched photo and required image ARIt may be that you wish to proceed with the photo that you have and make no change to its crop even if this is advised by the spreadsheet in Step 5. It may also be that, in preparing the print image, you decide to position the photo somewhat off-centre and construct asymmetrical inked margins. As mentioned in Option (a), no matter, what is essential is that the photo is resized and positioned to lie outside of, or coincide with, each duplication guideline in Step 13. From there, the duplication, mirroring, and trimming workflow accommodates any positioning by constructing the wrap from wherever the photo edge is placed out to the required inked margin.
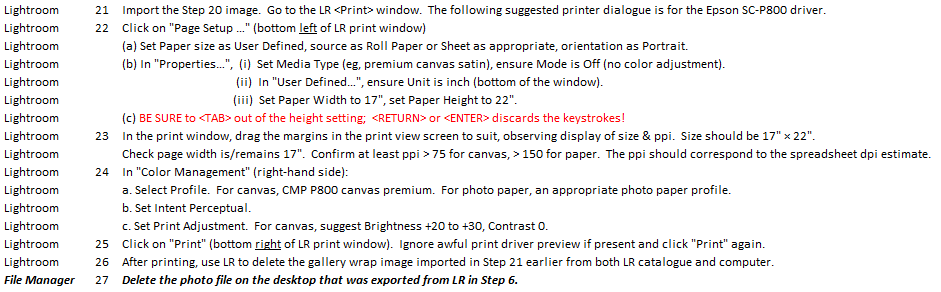
PrintingThe prepared print image is exported from Corel Draw and imported into Lightroom (or your printing application of choice) in Step 20. The suggested printing workflow is given in Steps 21 to 27, as below.
|
|
©2025 Lester Gilbert |