![]()
![]()
![]()
![]()
![]()
![]()
|
|
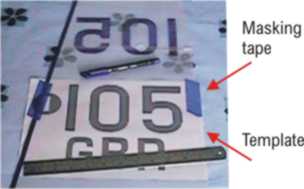
Following on from making a mast, these are some photos and comment on bending the sails and making an IOM No.1 or "A" rig. Sail numbersThe first step is to ink on the sail numbers, the national letters, and the class insignia. I use a "permanent" overhead transparency film pen. It comes off with acetone if necessary, but otherwise lasts well for a couple of years. Take care with the masking tape for the template, it should be a low-tack variety, otherwise it could bruise the sail (well, it bruised my sail!). The photo shows the starboard number on the mainsail inked in, and the port number being prepared.
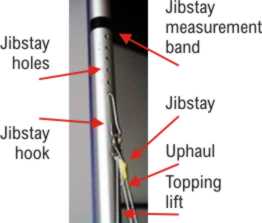
Slide a wire up the jib luff to make the jibstay. Attach an uphaul (mine is non-adjustable) to the jib head, and to the jibstay at the hounds. Because my jibstay is also non-adjustable, the mast instead has a number of holes, spaced to give 1 degree rake adjustment per hole. A jibstay hook is fashioned to a length that, when inserted into the topmost hole, gives the mast zero rake. In order to have the topping lift clear the jib leech, there should be at least 60mm between the jib head and the end of the jibstay.
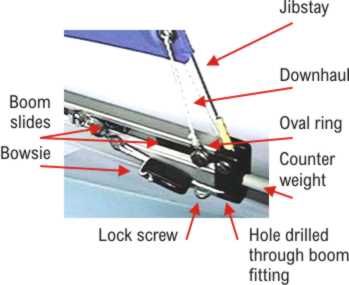
Jib boomMake an adjustable downhaul at the tack. The adjustment here should quite sensitive, so I loop the downhaul (tack attachment line) through the tack eyelet to give a 4:1 purchase at the bowsie. The photo shows a substantial gap between the jib foot and the boom. Ideally, this gap should be a lot less, maybe just 1mm or 2mm if you can manage that and still have adequate mast rake adjustment.
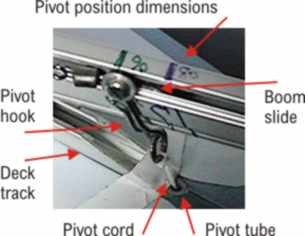
The position of the jib boom pivot should ideally be adjustable. I have two pivot positions on my jib boom at 80mm and 90mm from the tack.
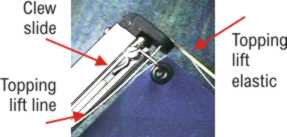
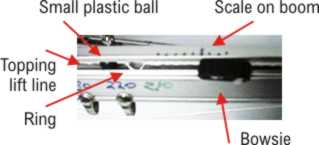
The topping lift has a length of "roach pole" elastic attached, to keep it from floating in a high breeze and hooking up on the spreaders. The elastic terminates in the boom with a small plastic ball, and a crimp. The boom aft end fitting is screwed to the boom, and can be moved in or out.
The topping lift goes to a sensitive adjuster with a 4:1 purchase by running up to an eye (fishing swivel) at the pivot attachment on the boom and back through a ring to a bowsie. The bowsie position (ie topping lift position) is measured against a scale inked on the boom. The major mark represents a "standard" twist setting of 10 degrees, while each minor mark yields a further 2 degrees of twist. The minor marks are spaced at 2mm, and give a 0.5mm change in topping lift length -- really small, but that is the fineness of adjustment required. The small plastic ball simply keeps the topping lift line inside the SailsEtc special section boom. While the topping lift line is quite fine, 30kg BS Dyneema (Spectra), the lift adjustment line that runs through the bowsie is somewhat thicker, 50kg Dyneema. This ensures the bowsie takes and keeps its position, since it can slip down the thinner line.
Finally, the jib boom is finished with a trio of sheet attachment shackles. I like to be able to vary the jib sheeting radius depending upon pivot position and whether the race course is dominated by beating/running, or by reaching. If reaching, I'll usually select a slightly larger radius to help with sailing by the lee on a broad reach.
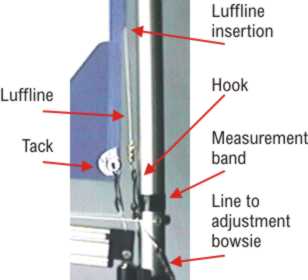
The sheet adjustment holes and the sheet hook are similar to those used on the main boom, and are shown on the "Mast" page. Mainsail lufflineThere are some preliminary remarks about the mainsail luff line on the "Luffline" page. The mainsail luff pocket must be prepared for the luff line. At the tack, I've cut away the luff pocket up to 40mm from the tack. At the head, I've cut a 10mm notch into the luff about 150mm down. The head insertion point for the luff line must be quite low down, otherwise the sail will not rotate easily around the mast on the reach or run. The luff line is inserted into the mainsail, and is attached at the head of the mast through a hole as shown. You might just be able to see two holes in the aft face of mast head. The top hole was a mistake, 'cos I didn't leave enough space between the bottom of the head fitting and the luff line attachment. You may also need to tape the luff line against the mast where it emerges to get it to lie flat against the mast aft face.
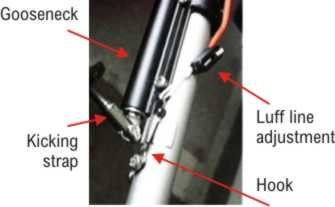
The luff line arrangement at the foot of the mainsail has been pulled away from the mast so it photographs well. In practice, the luff line is -- must be -- snug up against the aft mast face. In practice, the tack is also tied to the mast. The photo shows the luff line tension adjustment line passing to the forward face of the mast, opposite the gooseneck. This is fine if you have an open cockpit and easy access to the mast foot, but it doesn't work very well in my Ikon. I'll have to try a different arrangement.
In fact, the luff line tension arrangement includes a length of elastic, visible as the orange line in the photo. The tension line terminates at a hook screwed below the gooseneck, but you could as well use one of the gooseneck attachment screws.
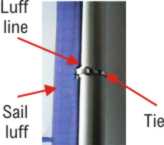
The luff is pierced in three or four places with a fine tipped soldering iron so the luff line can be tied to the mast. In order to obtain the right looseness of the tie, I make it with a 1.5mm rod placed against the mast, and then tie the luff line snugly. When the rod is removed, there is a small gap between the luff and the mast which allows the sail to rotate easily on the reach or run, but still remain snug against the mast.
Mainsail boomThe mainsail boom is treated on the "Building a mast" page, with the automatically easing downhaul (tack attachment line).2005-12-18 |
|
©2025 Lester Gilbert |