![]()
![]()
![]()
![]()
![]()
![]()
![]()
|
|
|
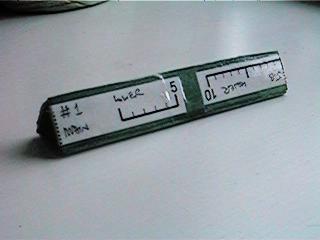
I've developed an alternative, which is based on measuring the gap between the ends of the sail battens and a reference line. The result is a gauge that clips to the mast. It has five scales, one each for the two jib battens and the three mainsail battens. Each rig has its own gauge. The photo shows a prototype gauge that was laser-printed onto an overhead transparency, and fitted with a clip, a cut down boom band.
The "production" version comprises each scale taped to a lollipop stick, with the stick screwed to a 10mm round electrical cable clip (nail removed, self-tapping screw substituted).
The gauge is calibrated for a jib pivot offset of 80mm from the jib luff, a jib sheeting angle (JSA) of 15 degrees, and a main sheeting angle (MSA) of 5 degrees. If you would like to construct your own gauges for different offsets or sheeting angles, there is a spreadsheet to download that'll help you do that. Let me know if you'd like me to e-mail you the CorelDraw V7 *.CDR files. Otherwise, the gauges are shown here as thumbnails; right click on each and save the *.GIF image to your local hard drive. They should print out at the right size at 150 dpi.
Procedure Clip the gauge to the mast, as high up as possible. Hold the yacht by the fin, at arm's length, looking at the stern, and with the yacht tipped down so the mast is roughly horizontal. This should place your eye at about the level of the stern. Wave the yacht from side to side (or, if outside, allow the breeze) to fill the sails. Close one eye, line up the backstay with the mast, and then sight the batten of interest to the relevant scale on the gauge. You can immediately read off the twist, in degrees, of the sail at that batten. The photo shows a lollipop stick scale clipped to the mast. Below the scale is a black patch -- this is the rear of the upper jib batten. The upper jib batten reads a twist of about 9 degrees. The topping lift nicely crosses the scale at approximately the zero point.
The scales for the mainsail have been adjusted for parallax. That is, you should keep your eye on the yacht centre-line, down at the stern, with the backstay lined up with the mast, while eyeballing the batten. The scales have been expanded to take account of the fact that you are sighting the batten at an angle to the scale, rather than at right angles. The parallax adjustment on the scales assumes that the distance between your eye and the mast is about 700mm -- well, that's what arm's length is for me -- so try and keep that distance as you use the gauges. If you are Pan Troglodytes, then you'll need to use the spreadsheet and make up your own gauges. To check that everything is set up reasonably, use the zero point on each scale. For the jib, the zero point corresponds to the topping lift, so when the gauge is properly positioned the topping lift should correspond with "0". For the main, checking is a little more tricky, since zero corresponds to the imaginary line that connects the clew to the head. If there is a little error, then just add or subtract that amount from the reading you take. If there is a big error, check the sheeting angles. The spreadsheet gives the gap that should exist between the sheet attachment point and the centre-line. For the main sheeted at 5 degrees and an attachment point 195mm from the gooseneck pivot, there would be just less than 20mm (17mm more exactly) between the boom and the main post. For the jib sheeted at 15 degrees and an attachment point 230mm from the swivel, there should be about a 60mm gap between the boom and the deck track. (A small auxiliary spreadsheet calculates the amount of twist given a linear measurement, if you just wanted to take your tape measure to the gap between the batten and a reference line. The reference line, in this auxiliary spreadsheet, is the topping lift for the jib, and for the main it is the backstay.) Version 2 of these scales were intended to be more conveniently clipped to the sail battens, so the twist can be read off rather more directly by using the topping lift or backstay. I've not found a way of doing this that doesn't foul up as the sail leech flaps from side to side. So instead I have Version 3, following a suggestion of Graham Bantock, where the scales are taped to the sides of a length of wood. The photo shows a triangular cross-section made by glueing the lollipop sticks together. The scale in view on the left measures the twist of the main at the bottom batten, using the backstay as a reference line. There is thus a gap before the scale begins its measurement, since the main boom is sheeted at 5 degrees for which the gap makes allowance. The scale, upside-down on the right, measures the twist in the jib at the lower batten, using the topping lift as the reference line.
The gauge is offered up to and gently pressed against the leech, twirled to the correct scale, and the twist then read off. The required scales are those that have NOT been adjusted for parallax; you'll need to use the spreadsheet for their measurements. An improved twist gauge assembles the lollipop sticks onto one length of wood; details here. 2005-12-18 |
|
©2025 Lester Gilbert |